Introduction
Mini Oreo Cheesecakes are the perfect dessert for anyone who loves the classic combination of Oreo and cheesecake. These adorable bite-sized treats are made with an Oreo cookie crust and a light, creamy cheesecake filling.
 mini oreo cheesecakes
The best part? They are no-bake, making them an easy and quick option for any occasion. With only two-ingredient crust and a smooth cheesecake filling, these treats are topped with whipped cream and a mini Oreo for the cutest presentation.
In just 30 minutes, you can create these luscious, epic cheesecakes that everyone will love. Whether you’re serving them at a party or just treating yourself, these mini desserts are always a popular choice.
Made in a muffin pan, they’re easy to serve and sprinkled with extra cookies and cream pieces for that extra touch. These Mini Oreo Cheesecakes are simply the best way to enjoy a delicious dessert with a fun twist!
 EASY MINI OREO CAKE BITES
Helpful tools:
When making mini Oreo cheesecakes, having the right tools makes the process much easier. A mini cheesecake pan with a metal base is incredibly helpful. It allows you to create perfect, personal serving size cheesecakes with straight sides.

After layering your crust and filling, you chill them in the pan. Once set, simply push up the base from the bottom, and the cheesecake will pop up through the top, making it easy to remove.
 mini cakes tray filling
It’s also important to ensure all your ingredients are at room temperature before mixing. This helps everything incorporate smoothly, resulting in a smooth cheesecake filling.
If you’re looking to make things even easier, you can skip making the crust altogether and use an Oreo at the bottom of each mini cheesecake. If the tops crack during baking, cover them with homemade whipped cream or even some chocolate ganache to make them look perfect.
Tips For the Best Mini Oreo Cheesecakes
Refrigerate for the Perfect Set
One of the most important steps in making Mini Oreo Cheesecakes is allowing them to refrigerate long enough to set properly. I recommend letting them chill for at least 8 hours or overnight in the fridge. The cheesecakes will remain too soft and may not come out of the pan cleanly if you don’t give them enough time. If you need to speed things up, you can place them in the freezer for 10-15 minutes after they’ve chilled to make sure they’re firm enough to remove easily.
Whip to Perfection
For that smooth, airy texture, you need to whip the cream and heavy cream together at high speed. The goal is to create a thick, stiff peak that will hold the structure of your cheesecake. Be sure to use a whisk when whipping, and once the mixture is fully incorporated, fold in the Oreos gently to keep the air in the mixture. This step ensures your cheesecake has that fluffy, creamy feel that everyone loves.
Use a Warm Towel for Easy Removal
When it’s time to remove the mini cheesecakes from the pan, I’ve found that using a warm, damp rag or towel works wonders. Simply rub it around the base of the individual tin to help loosen the sides of each cheesecake. This little trick makes it so much easier to pop the cheesecakes out with clean, straight sides, giving them a beautiful presentation.
Mini Cheesecake FAQs
1. What Can I Use If I Don’t Have a Mini Cheesecake Pan?
If you don’t have a mini cheesecake pan with a removable bottom, you can easily substitute it with a standard muffin tin and cupcake liners. For slightly larger cheesecakes, you can use a mini muffin pan or a regular muffin tin. The liners help in removing the cheesecakes without hassle, even without the removable bottom.
2. How Do I Remove Cheesecakes from the Pan if They’re Stuck?
If your cheesecakes aren’t coming out of the pan, try rubbing a warm, damp towel around the exterior sides of each tin right before you push up the base. This method works wonders for getting those clean, straight sides and helps loosen the cheesecakes with ease.
3. How Do I Get the Base Off the Cheesecake Crust?
To get the base off the crust, simply push the cheesecake out of the tin. The metal removable bases will separate easily from the crust, thanks to the butter. It’s also helpful to grease the bottom of the pan before adding the crust to make the process even smoother.
4. Why Didn’t My Cheesecakes Set Up Properly?
If your cheesecakes are too soft or haven’t set after 8 hours or overnight in the fridge, it’s likely because the heavy cream wasn’t whipped enough. You can pop the pan in the freezer for 10-15 minutes to help them firm up, making them easier to remove from the pan.
5. How Do I Store Mini Cheesecakes?
You can store your finished mini cheesecakes in an airtight container in the fridge for up to 3 days or in the freezer for up to 3 months. Be sure to wait until right before serving to add the whipped cream and mini-Oreos for the best presentation.
6. Can I Use a Larger Pan for Mini Cheesecakes?
While a mini cheesecake pan is ideal for this recipe, you can also use a regular muffin tin to make slightly larger cheesecakes. The key is to ensure you line the pans with cupcake liners, which will make removing the cheesecakes much easier.
Ingredients:
Here’s the recipe ingredients:
For the Oreo Base:
- 18 chocolate sandwich cookies (Oreos)
- 4 tablespoons (56g) melted margarine (butter)
For the Oreo Cheesecake Filling:
- 24 oz (3 blocks or 681g) cream cheese, softened
- 2 cups (230g) confectioners’ sugar (powdered sugar)
- 1 tablespoon vanilla essence (vanilla extract)
- 1 ½ cups (360ml) whipping cream (heavy cream)
- 12 chocolate sandwich cookies, roughly chopped or crushed (Oreos)
For the Chocolate Ganache:
- ⅓ cup (84g) dark chocolate pieces, chopped
- ⅓ cup (84g) whipping cream (heavy cream)
For the Garnish (optional):
- whipped topping (whipped cream)
- 24 mini chocolate sandwich cookies (mini Oreos)

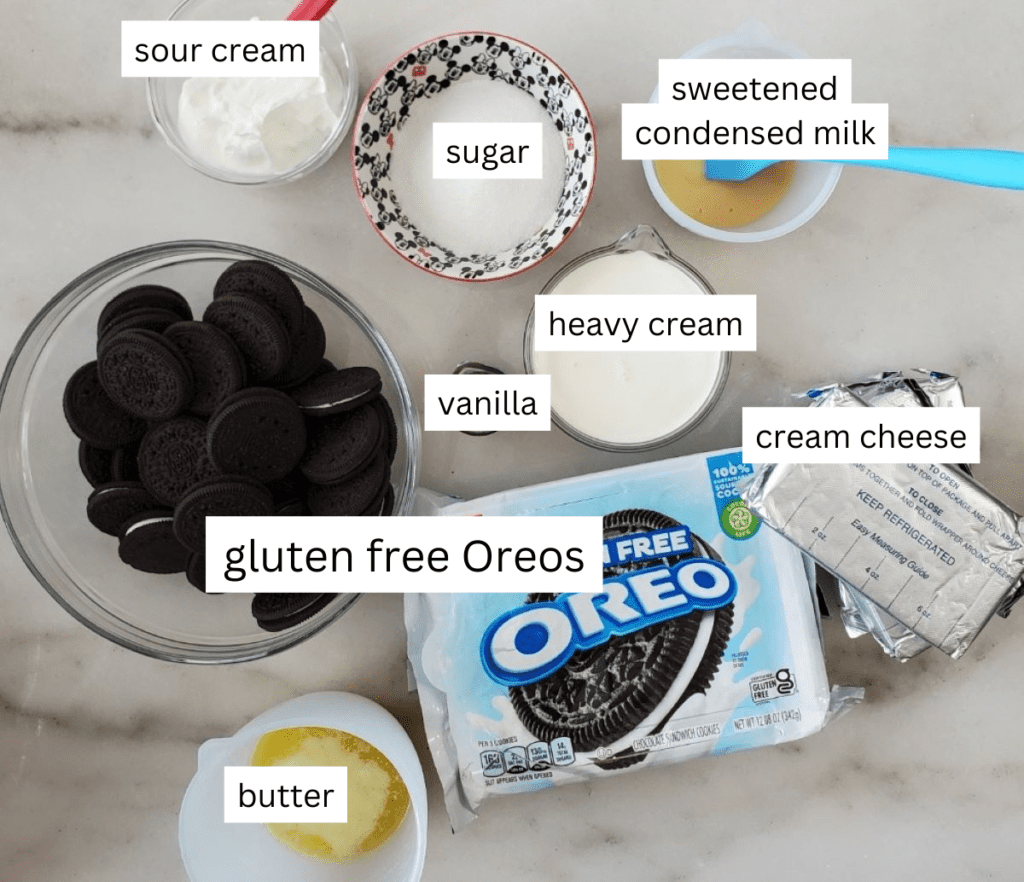 MINI OREO CHEESE CAKE INGREDIENTS
Mini Oreo Cheesecake recipe:
Here’s the Mini Oreo Cheesecake recipe in clear steps:
Oreo Base:
- Crush 18 Oreo cookies into fine crumbs using a food processor.
- Add 4 tablespoons of melted butter and pulse until well combined.
- Grease two 12-cup mini cheesecake pans with cooking spray.
- Press 1 tablespoon of the crust mixture into each pan, compacting it at the bottom.
- Chill the pans in the fridge while preparing the cheesecake filling.
Cheesecake Filling:
- In a stand mixer, beat 24 oz of cream cheese and 2 cups of powdered sugar until smooth.
- Add 1 tablespoon of vanilla extract and mix until incorporated.
- Switch to the whisk attachment. On low speed, gradually add 1 ½ cups of heavy cream.
- Increase the speed to high and whip for 20–30 seconds until stiff peaks form.
- Gently fold in 12 crushed Oreos.
Assembling the Cheesecakes:
- Pipe the cheesecake filling into each pan, smoothing the tops with an offset spatula.
- Refrigerate the cheesecakes for 8 hours or overnight to set.
Ganache & Topping:
- Combine ⅓ cup of dark chocolate and ⅓ cup of heavy cream in a heat-safe bowl.
- Heat in the microwave for 20-second intervals, stirring in between, until melted and smooth.
- Spoon a small amount of ganache onto the center of each cheesecake and let it cool slightly.
- Top each cheesecake with a dollop of whipped cream and a mini-Oreo.
Enjoy your delicious, mini Oreo cheesecakes!